
Implement Google Maps For Android
Provides all the steps required to integrate Google Maps with Android applications using Java.
There are several applications which need an integration with Google Maps either on the Contact Us Screen or to show Office Locations. Also, there are applications which completely depends on Google Maps to have a location-based search engine. The applications also use Google Maps to show navigational directions on a real-time basis. This tutorial provides all the steps required to have a basic integration of Google Maps with Android Applications. It also shows, how to implement Google Maps for the Android Applications using Java as the programming language.
It assumes that the user is familiar with the Google Developer Console and knows the basics of Android development using Java. You can follow How To Install Android SDK Tools On Windows, How To Install Android SDK Tools On Ubuntu, How To Install Android Studio On Windows, and How To Install Android Studio On Ubuntu 18.04 to install Android SDK Tools and Android Studio with Hello World application to deploy your first Android application to either Virtual Device or Physical Device.
Notes: You must use either the Google APIs system image or the Google Play system image to deploy the application on the Virtual Device. Also, make sure that you have enabled Google Play services.
You may also be interested in - Implement Google Maps In Ionic 4 For Android.
Create Credentials
We need to create the credential specific for native Android applications in order to implement the Google Maps service. Log in to Google Cloud Platform and click on the Navigation Menu(Top left Menu Icon), hover on APIs & Services and click on Credentials Link as shown in Fig 1.
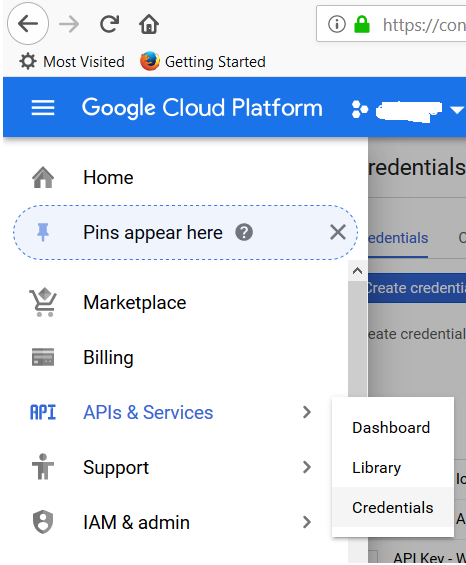
Fig 1
The above action shows All Credentials Page having a list of active credentials. Click on the Create Credentials
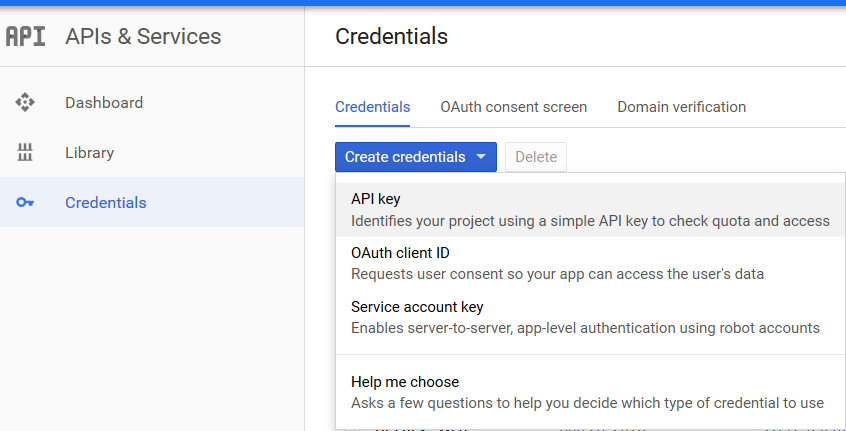
Fig 2
It will show the newly created API key as shown in Fig 3. Copy the API key to configure the application for maps.
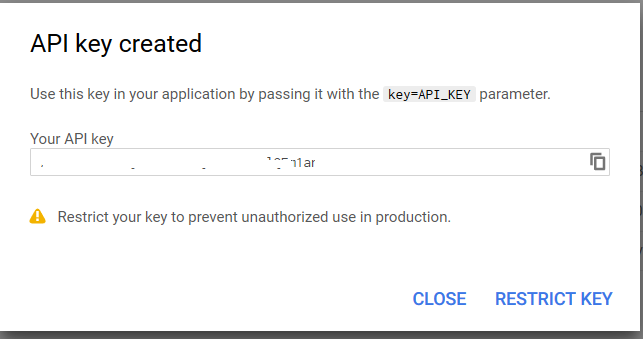
Fig 3
You can either continue using the key in unrestricted mode or follow the steps in the next section to use it in protected mode.
Protect the API Key - Key restrictions
It's a little bit complex to make the build with the
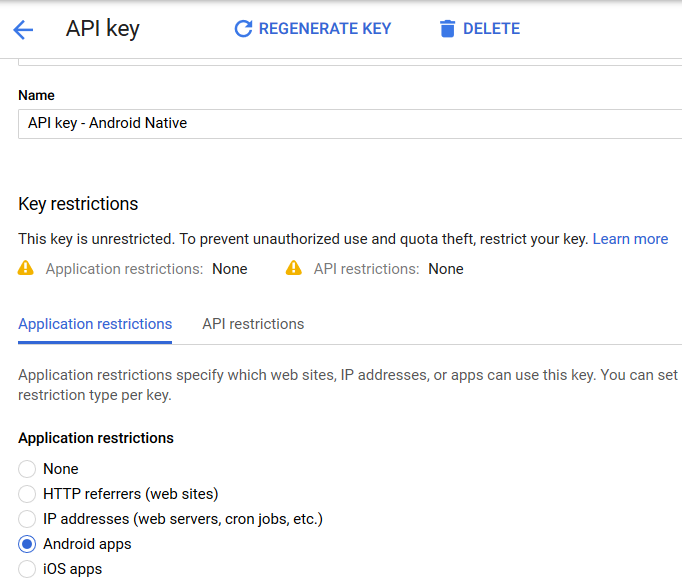
Fig 4
Restrict key usage to the specified Android apps by adding an item to the section - Restrict usage to your Android apps. It's mandatory in case you have opted to restrict the applications to Android apps as shown in the below mentioned figure.
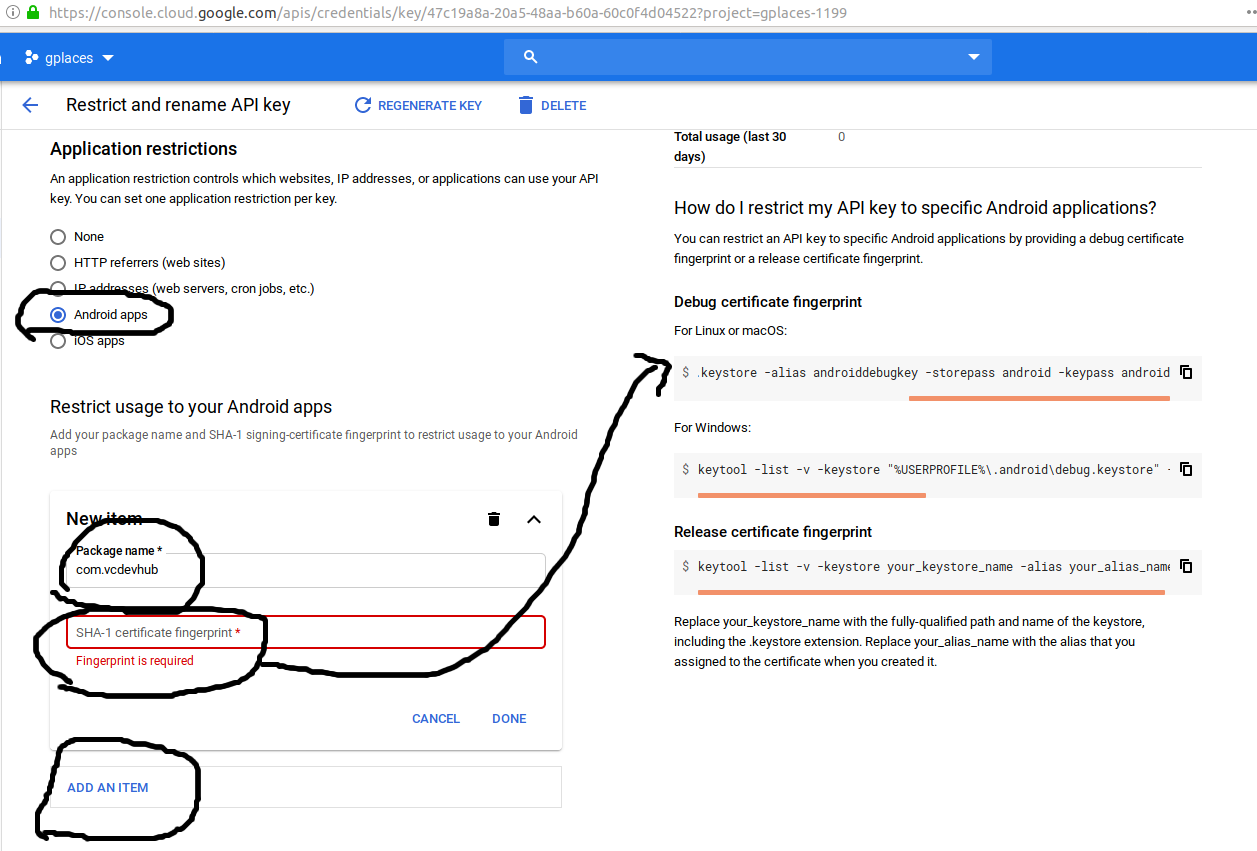
Fig - API Key Restrictions
Use the
# Get the SHA1 and SHA256 fingerprints
keytool -list -v -keystore release-key.jks -alias vcdevhub
Now copy the fingerprint and update the SHA-1 fingerprint within the section - Restrict usage to your Android apps on Google Cloud Platform and click on the DONE
Restrict Services
You can also restrict the key to access Android Maps services only as shown in Fig 5.
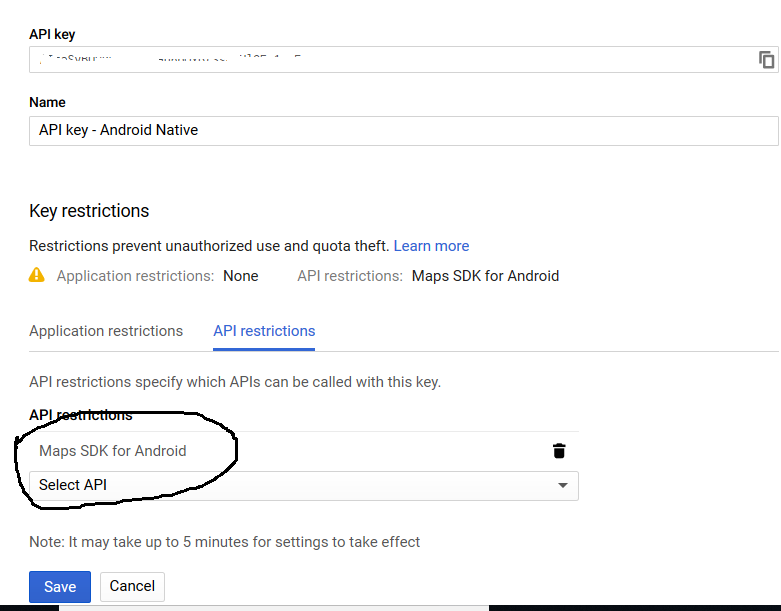
Fig 5
Again click on Navigation Menu -> APIs & Services -> Library to view all the available services. Search for Maps as shown in Fig 6.
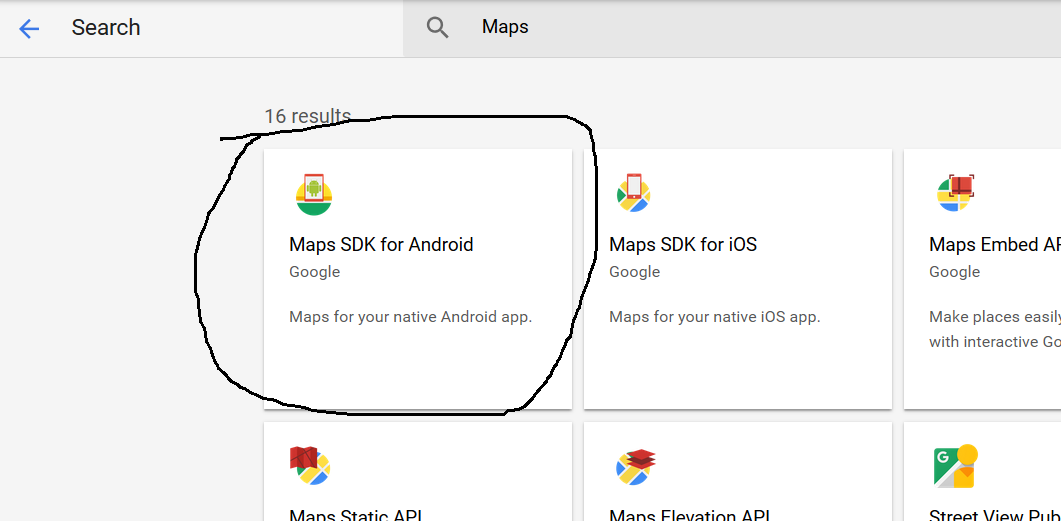
Fig 6
Click on Maps SDK for Android and then click on the Enable
Create Maps Application
In this section, we will develop the Maps application following the steps mentioned in the How To Install Android Studio On Windows, and How To Install Android Studio On Ubuntu 18.04 tutorials.
Create the Maps project as shown in Fig 7. Make sure to replace the Package Name with your application Package Name. It must be the same as the one used for Application restrictions on the Developer Console.
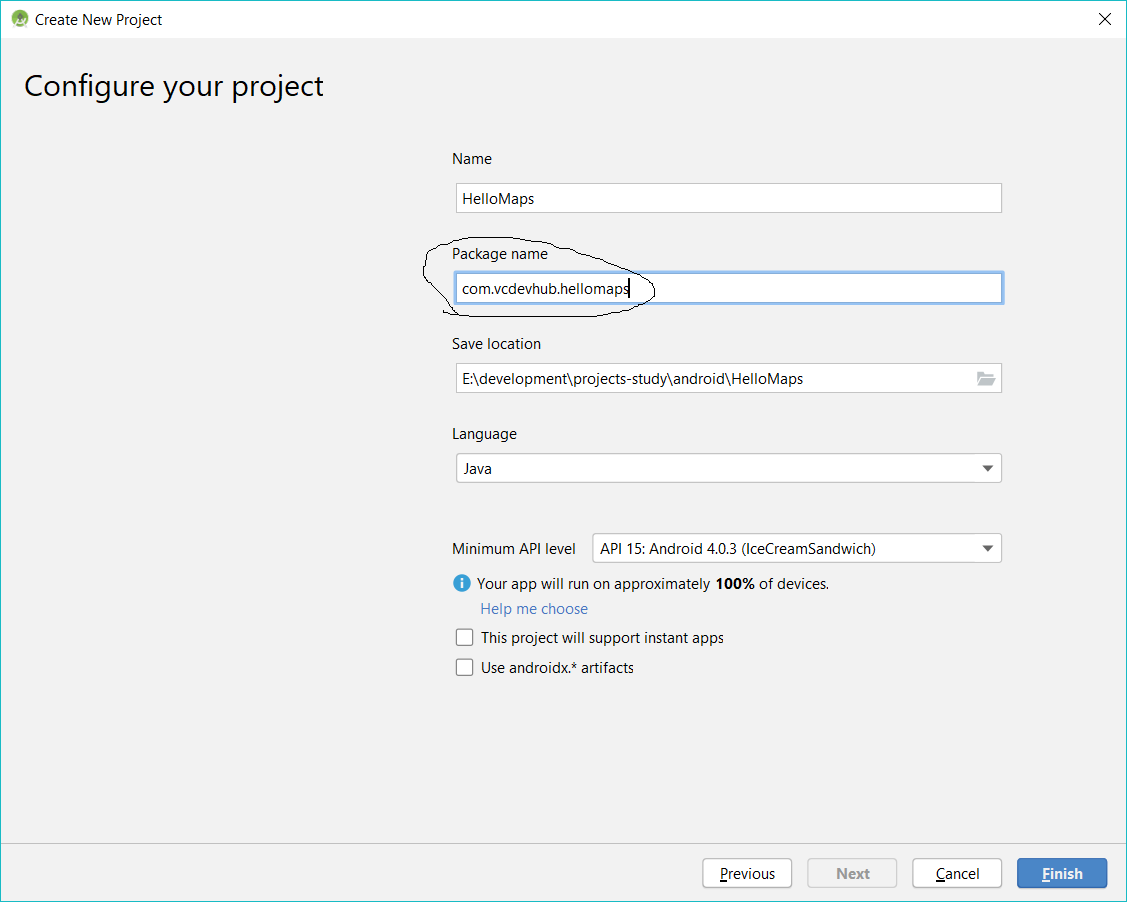
Fig 7
Now create the Maps Activity as shown in Fig 8 and Fig 9.
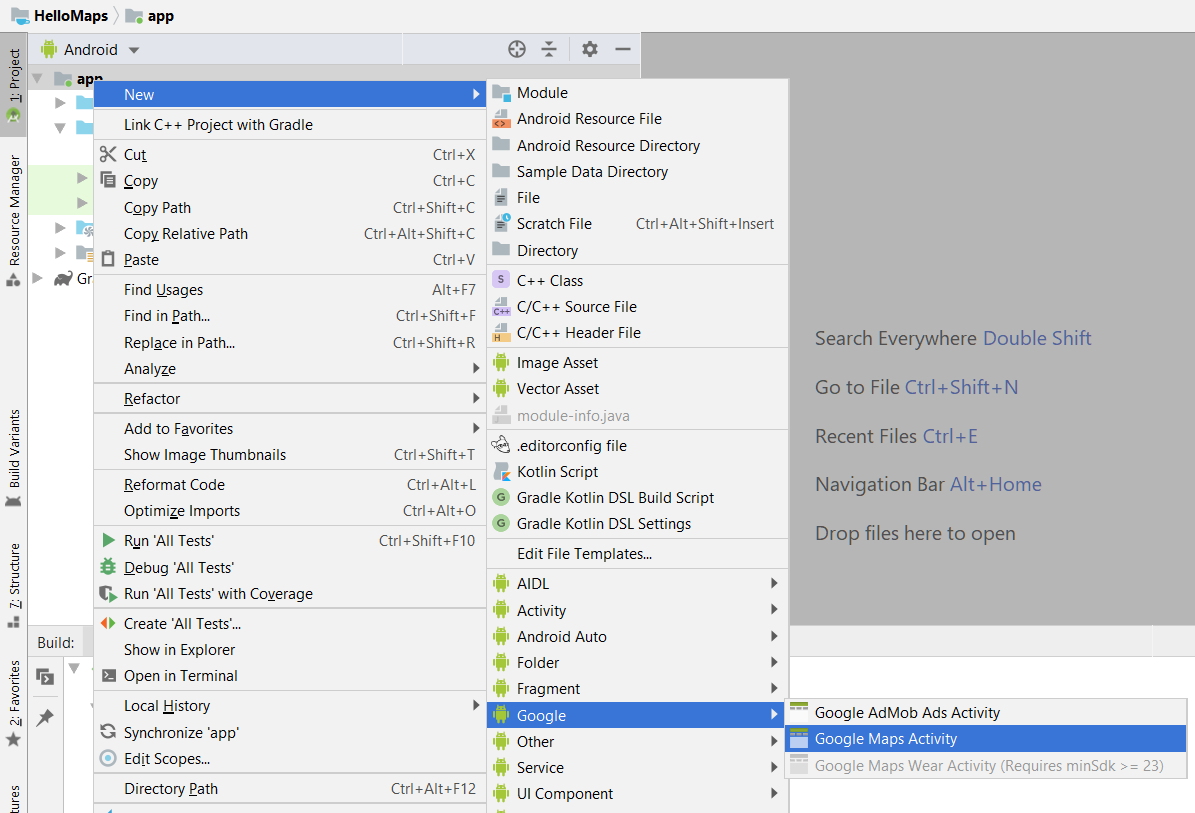
Fig 8
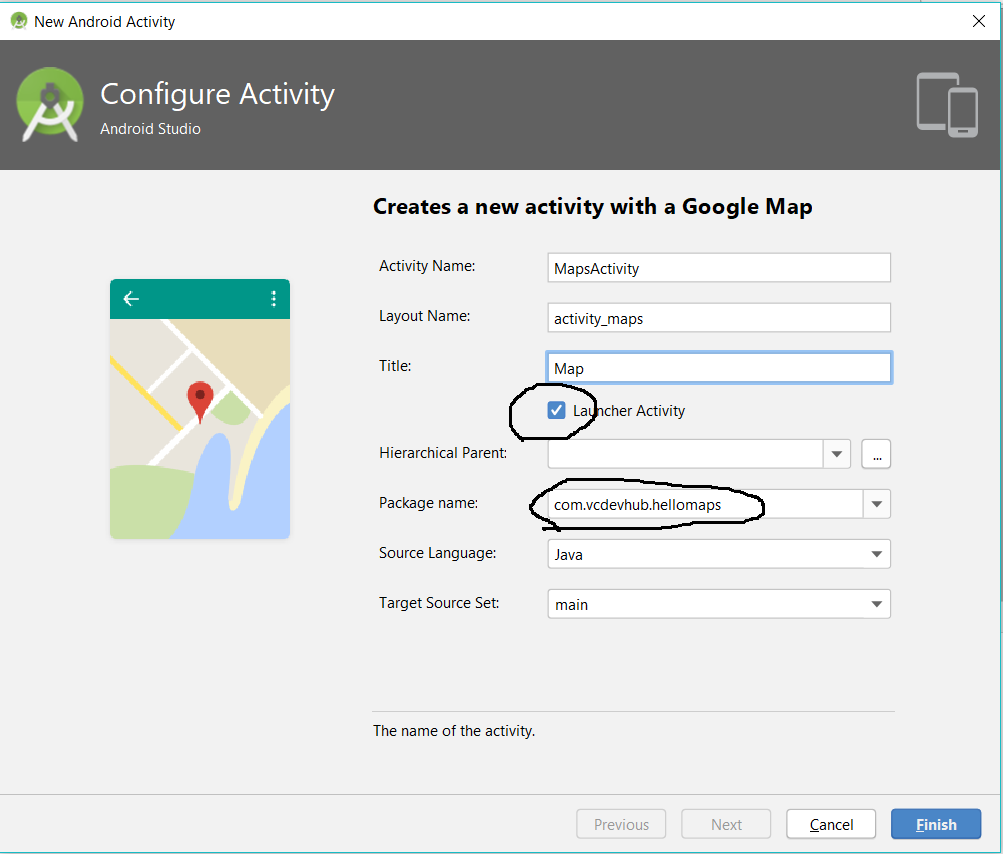
Fig 9
Click on the Finish
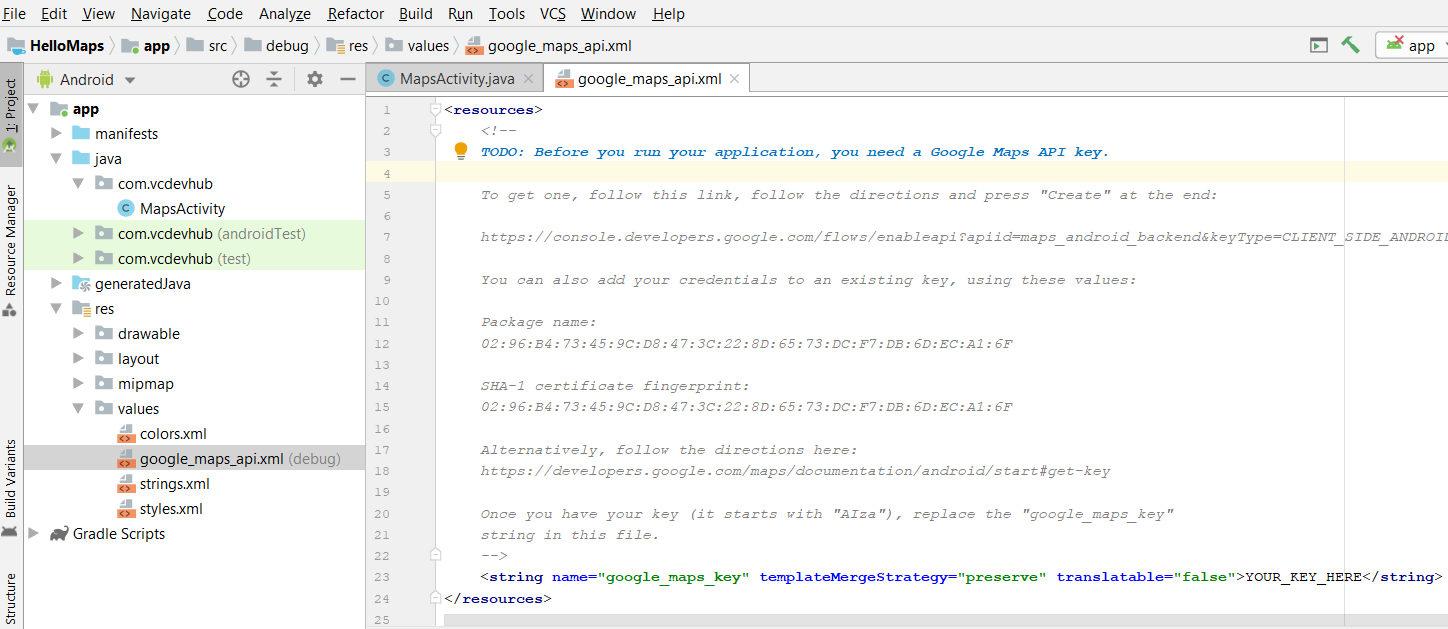
Fig 10
The file google_maps_api.xml consists of the instructions to obtain the API key which we have already covered in the previous sections of this tutorial. First, we will deploy the application without Application restrictions using the key as shown in Fig 11. Make sure that Application restrictions are set to None at this stage as mentioned in the steps Create Credentials and Restrict Services skipping the step Protect the API Key - Key restrictions.

Fig 11
Now open the MapsActivity.java file. It must have the default code added by Android Studio as shown below.
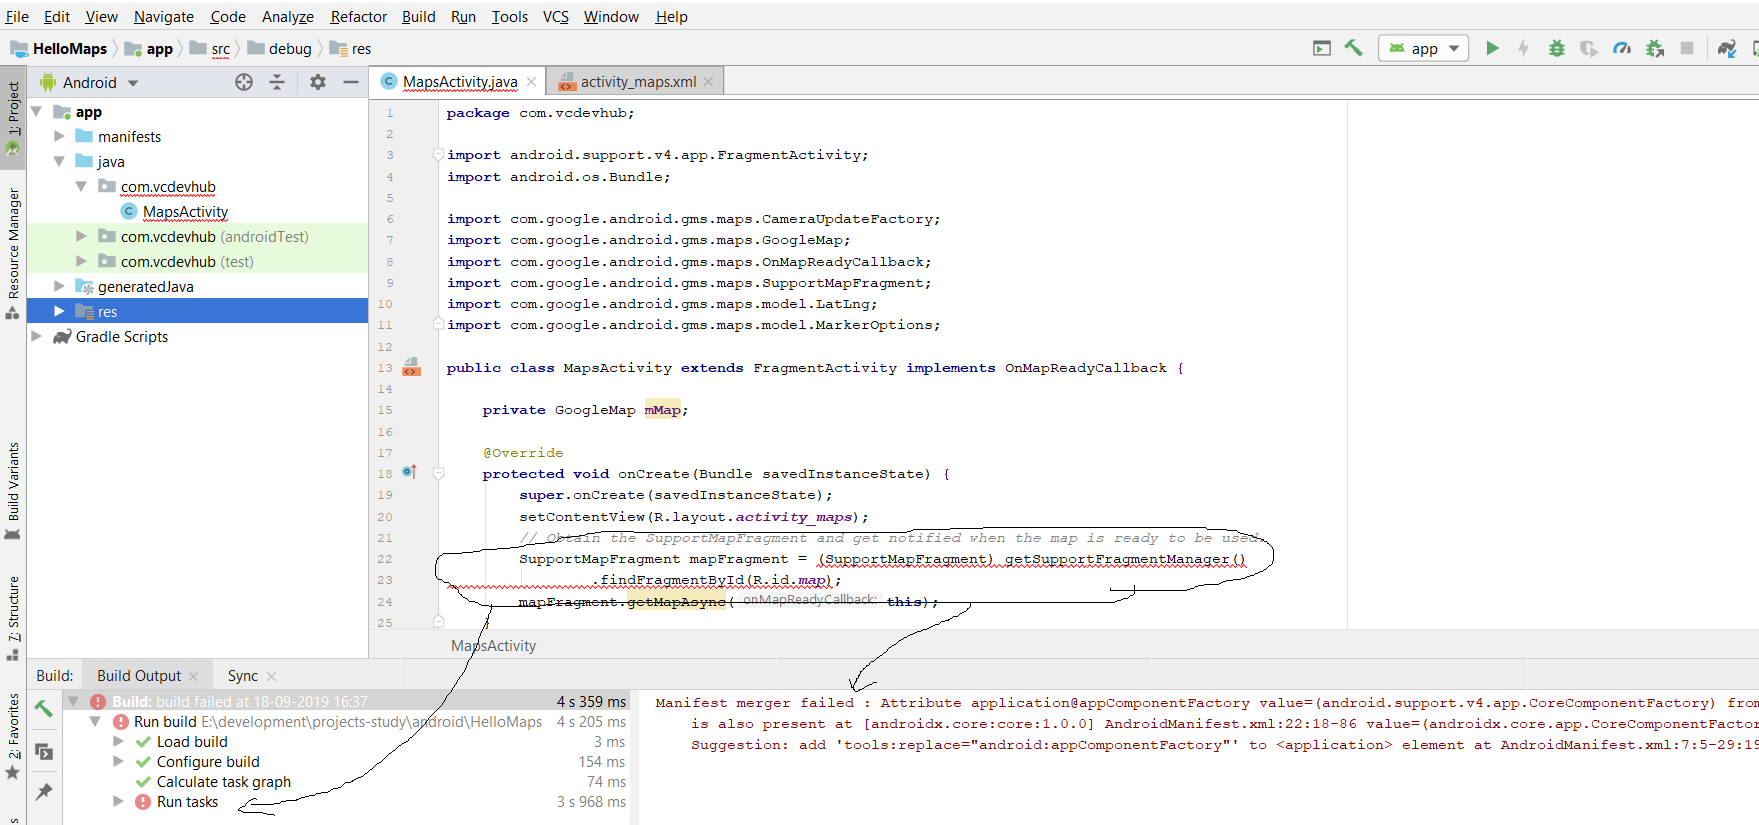
Fig 12
In case you see the errors as highlighted in Fig 12, you need to enable Google Play services as shown in Fig 13.
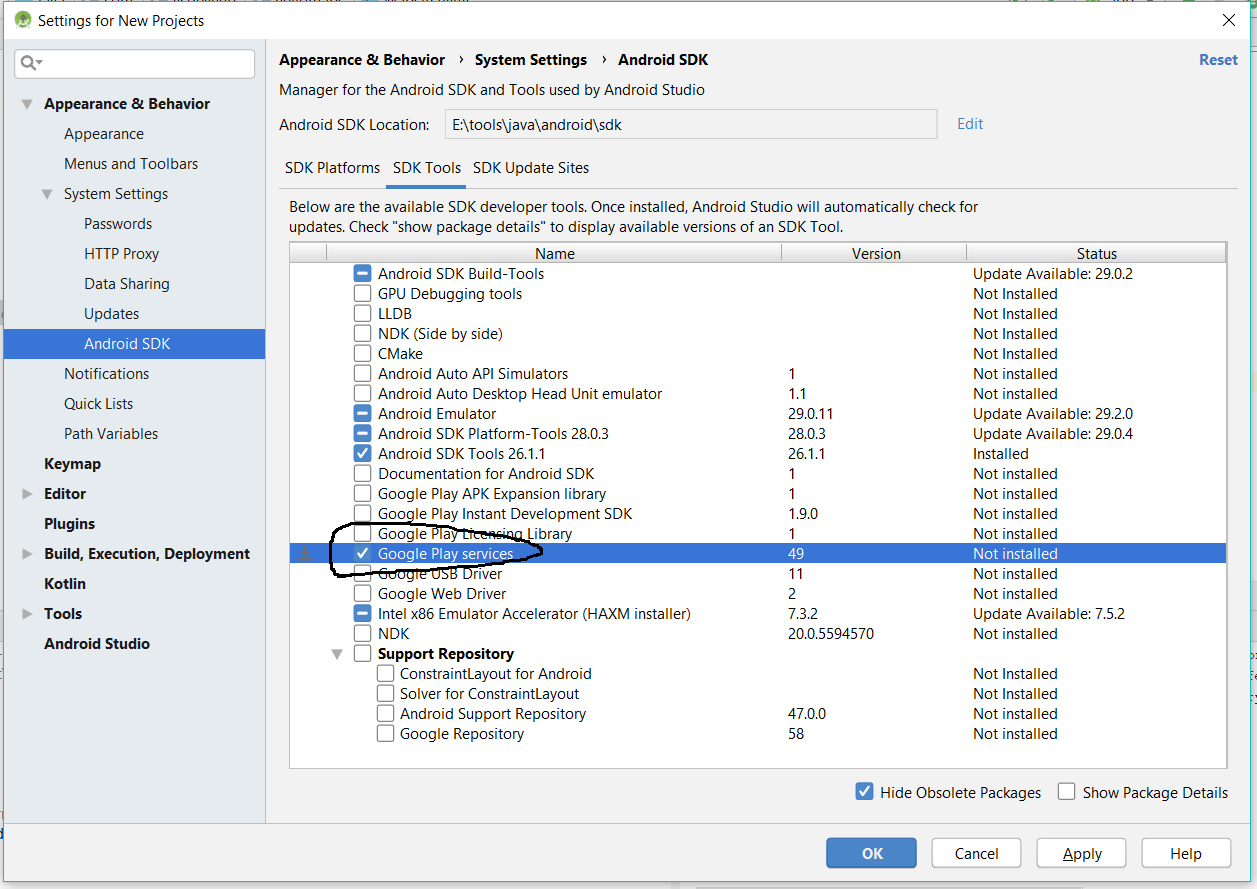
Fig 13
Also, migrate the project to AndroidX as shown in Fig 14 to resolve the errors completely.
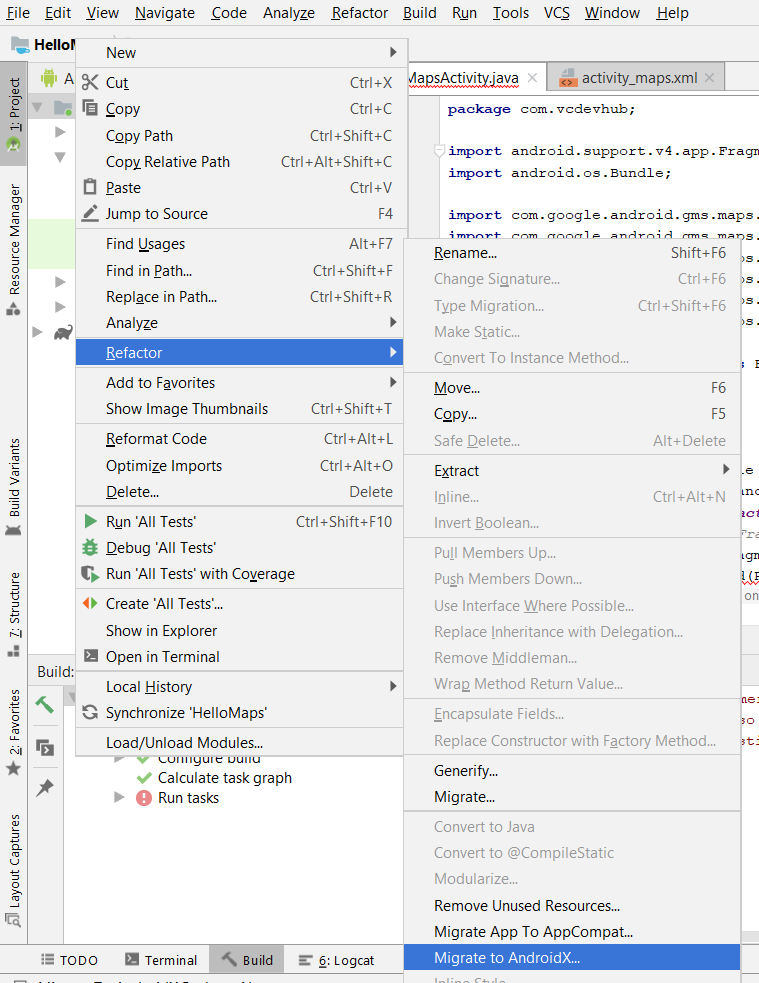
Fig 14
Complete the refactor task by clicking on the Do refactor Button. It will resolve the errors as highlighted in Fig 12.
I have updated the MapsActivity to use California as the default location as shown below.
package com.vcdevhub.hellomaps;

import android.support.v4.app.FragmentActivity;
import android.os.Bundle;

import com.google.android.gms.maps.CameraUpdateFactory;
import com.google.android.gms.maps.GoogleMap;
import com.google.android.gms.maps.OnMapReadyCallback;
import com.google.android.gms.maps.SupportMapFragment;
import com.google.android.gms.maps.model.LatLng;
import com.google.android.gms.maps.model.MarkerOptions;

public class MapsActivity extends FragmentActivity implements OnMapReadyCallback {

    private GoogleMap mMap;

    @Override
    protected void onCreate( Bundle savedInstanceState ) {

        super.onCreate( savedInstanceState );
        setContentView( R.layout.activity_maps );

        SupportMapFragment mapFragment = (SupportMapFragment) getSupportFragmentManager().findFragmentById( R.id.map );

        mapFragment.getMapAsync(this );
    }

    @Override
    public void onMapReady(GoogleMap googleMap) {

        mMap = googleMap;

        LatLng losAngeles = new LatLng( 34.0207305,-118.6919261 );

        mMap.addMarker( new MarkerOptions().position( losAngeles ).title( "Los Angeles" ) );
        mMap.moveCamera( CameraUpdateFactory.newLatLng( losAngeles ) );
    }
}
Google Map Options
We can further customize the Google Maps either by adding additional markers or by changing the Map type or zoom level as shown below.
Additional Marker - We can add additional markers as shown below.
// Additional Marker
LatLng sanJose = new LatLng( 37.2970523,-121.9574988 );

mMap.addMarker( new MarkerOptions().position( sanJose ).title( "San Jose" ) );
Map Type - We can also configure the map type as shown below.
# Normal Map
googleMap.setMapType( GoogleMap.MAP_TYPE_NORMAL );

# Hybrid Map
googleMap.setMapType( GoogleMap.MAP_TYPE_HYBRID );

# Satellite Map
googleMap.setMapType( GoogleMap.MAP_TYPE_SATELLITE );

# Terrain Map
googleMap.setMapType( GoogleMap.MAP_TYPE_TERRAIN );
Zoom Level - We can change the zoom level as shown below. Apart from changing the zoom level, we can also enable or disable zoom.
# Set Zoom Level
mMap.animateCamera( CameraUpdateFactory.zoomTo( 8.0f ) );

# Enable/Disable Zoom
mMap.getUiSettings().setZoomGesturesEnabled( true );
Build the Application
Build the application by selecting Build -> Rebuild Project. It should successfully build the project without any errors.
Run the Application - Without Application restrictions
Once the build completes successfully, simply run the application to deploy on android device as shown below in case you have not restricted the key to Android apps as shown in the previous section. Also, make sure that you have at least one active virtual device(with Google APIs) or physical device available to run the application.
Click on Run -> Run app or press Shift + F10 to launch the device choose as shown in Fig 15 - A.
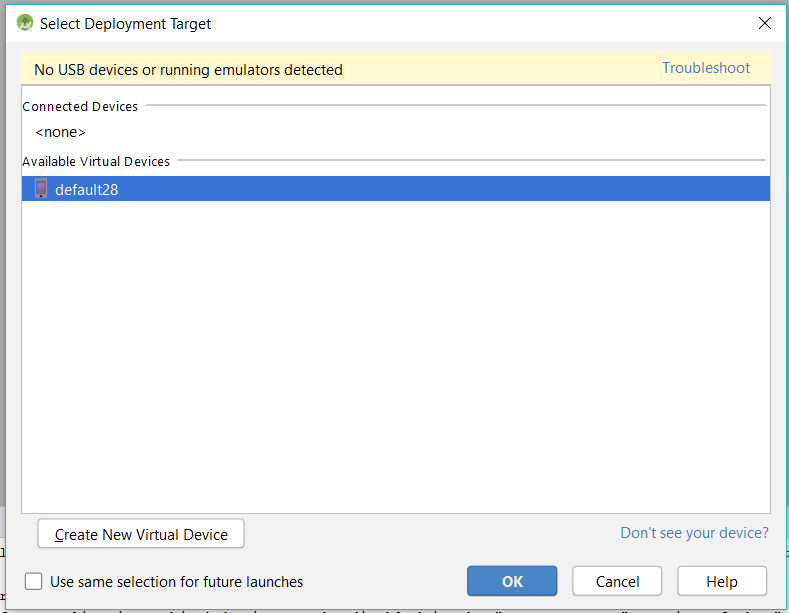
Fig 15 - A
It shows the output on my device as shown in Fig 15 - B.
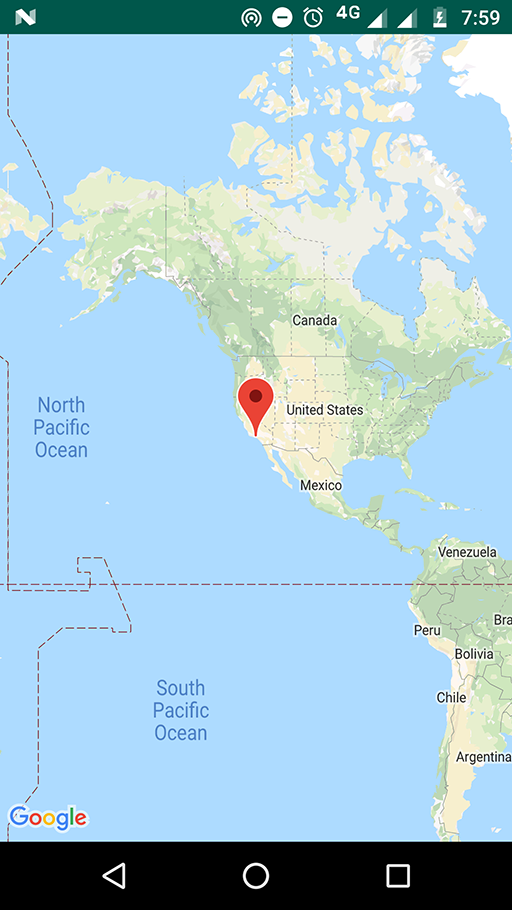
Fig 15 - B
Run the Application - With Application restrictions
It's a little bit complex as mentioned by me in the previous section while generating the key, but at the same time, it's the secure way to generate the build for production mode. In the previous step i.e. Protect the API Key - Key restrictions, we saw how to apply restrictions to the Key. In this step, we will see the complete steps to generate the signed APK for production usage.
Click on Build and choose the option Generate Signed Bundle / APK ... to start creating the signed APK for distribution as shown in Fig 16.
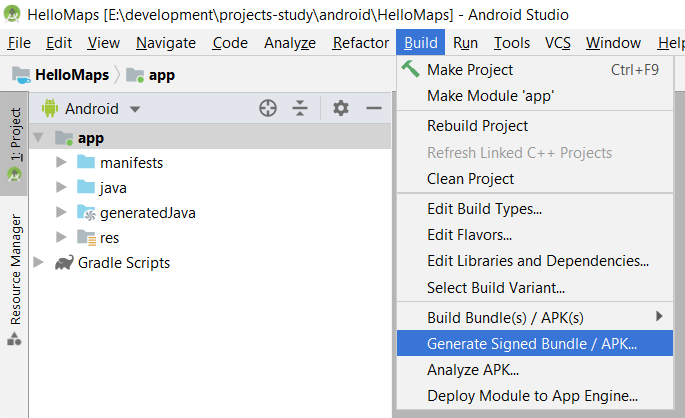
Fig 16
Choose the option APK to generate the release APK only as shown in Fig 17.
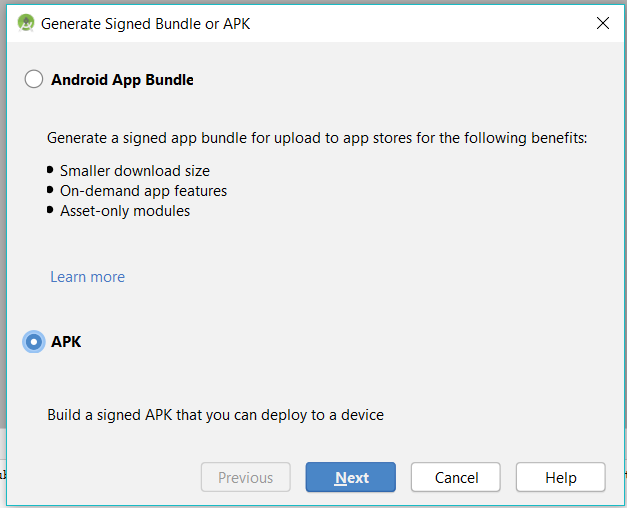
Fig 17
Click on the Next Button to continue and click on the Create New Button to create a new Keystore as shown in Fig 18.
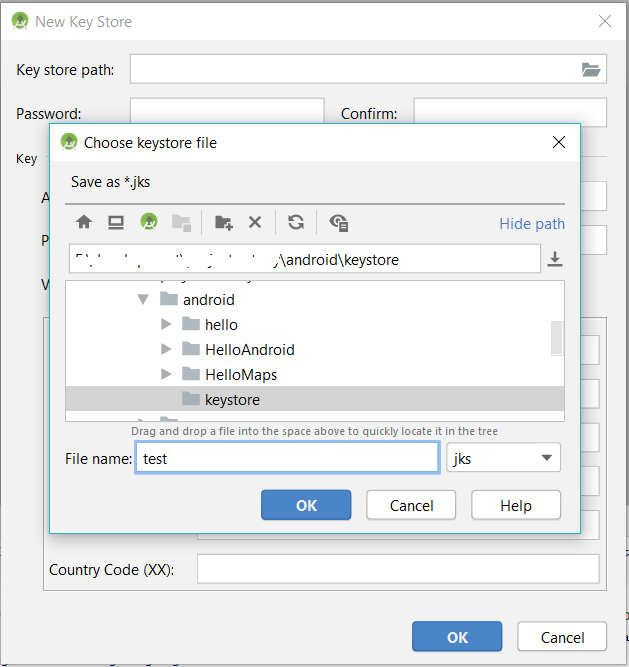
Fig 18
Fill the details as shown in Fig 19 and click on the OK button to create the Key Store.
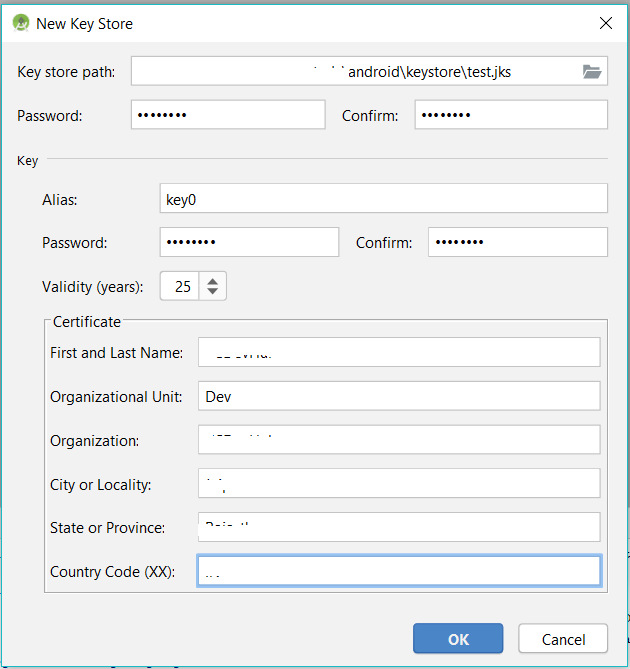
Fig 19
Now specify the Key Store password and alias as shown in Fig 20.
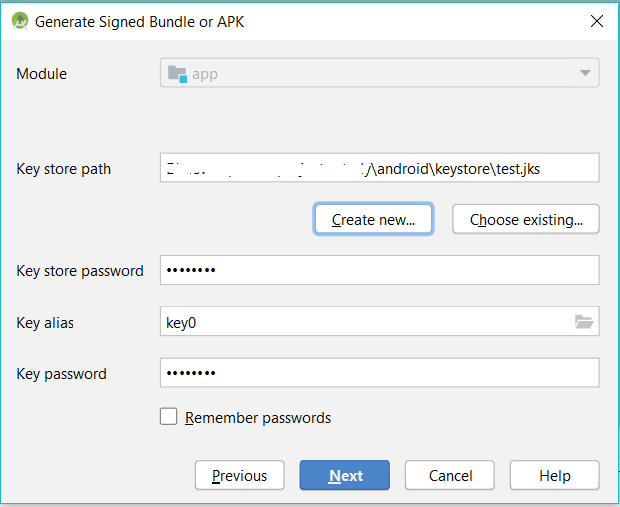
Fig 20
Click on the Next Button to choose the build types as shown in Fig 21.
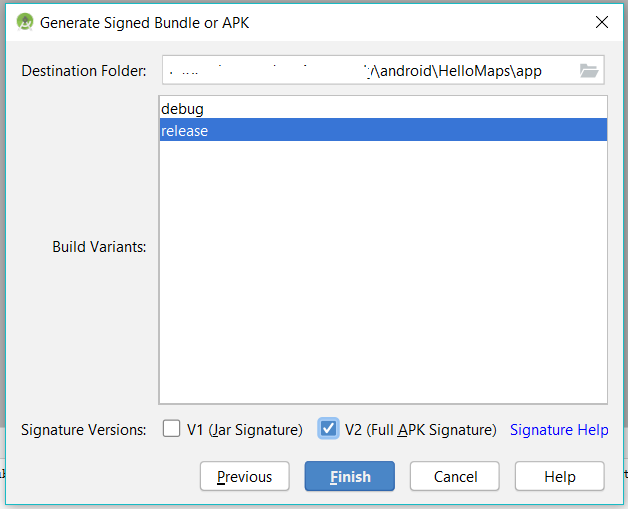
Fig 21
Click on the Finish
Now generate the SHA-1 Fingerprint using the command as shown below.
# Generate SHA-1 Fingerprint
keytool -list -v -keystore test.jks -alias key0
Also, configure the Credentials on the Developer Console as shown in Fig 22.
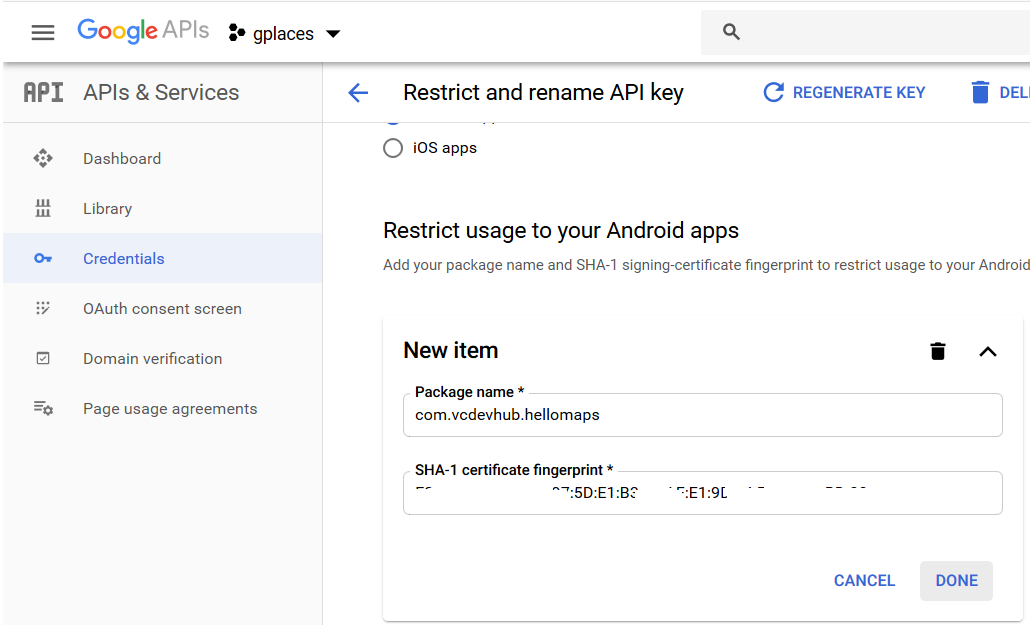
Fig 22
This is how we can generate the
Key Notes
These notes might be handy in case the default emulator without custom hardware profile does not work out of the box.
* Use the Google Play Services system images to create the AVD.
* Try to increase the Heap size.
* Use pre-configured hardware profile Nexus 5 or Nexus 5s configured with Play Store.
* Connect your device with the system and run the application instead of using AVD.


